The more I think I know, the less I actually understand.
I’ve spent parts of the day assembling the parts I’ve already printed and it was quite enlightening. The reason I go with Magnetic+Openlock is because that’s what Devon recommends in the tutorial.
I love doing openlock + magnetic. Magnets make life way easier when you are quickly building a map at the table. Openlock makes it much easier to build rooms ahead of time that you don’t have to worry about getting knocked apart. The combination is great.
The OpenForge sets introduction
I was really excited to try this out as I could see the potential in this setup, but when I tested this earlier today it turns out that magnets aren’t that great, much to my dismay.
It could very well be that I bought the wrong sort of magnets, I had to order mine from a source in Europe, but the tiles didn’t attach well at all and as spherical magnets do have polarity I even ended up with tiles repelling each other. [Edit: It turns out that you're meant to use neodymium magnets, but I unfortunately only found this information in the instructions for this Thingiverse collection, after I bought the cheaper ferrite magnets.]
In the end I was able to remove all magnets from the bases without ruining neither the magnets nor the bases so no real harm done. It’d been neat to get this to work but it’s not a big deal.
The OpenLock system works like a charm on the other hand. It snaps together with a satisfactory click and stays together. Yes, it’s a bit more time consuming to build compared to magnets but we’re talking minutes so again, not a big deal.
Let’s keep building
I ended the previous part with a wall and it’s base being printed, and as I write this there is another three walls and bases, as well as three more cut-stone floor tiles on the way.
With these printed I need to tackle the so far most confusing asset, the corner, in order to be able to build something useful. This is a prime example of where the disjointed nature of OpenForge comes to light.
I’ve been ignoring the very obvious elephant in the room, namely where you can find all of the assets I talk about without having to trawl through GitHub and Thingiverse, on purpose. The reason for that is because I don’t really know where to get the correct version.
Some pages are linked to from the official tutorial only to be labeled as deprecated and in turn pointing to a new page that contains almost the same information and/or files. I’m hoping to be able to post some sort of guide when I’ve figured out what’s what.
There are three links to cut-stone corners in the set description at GitHub, with two of them being deprecated and redirecting to the first so I guess this is the official one to use. The image below shows one of the corners in this collection.

Notice anything “odd” about this one? Yeah, there’s only 1.5 inches of floor with the rest of the 2 x 2 tile being used by the wall. For reference, here’s what an “E” floor looks like.

If I attach this floor tile to that corner tile it’s not going to work, or at least it’s going to look really dumb.
Ok, after roughly 20 minutes of poking around the various files I’ve downloaded I just found out that there are specific corner walls that are different from stand-alone walls.
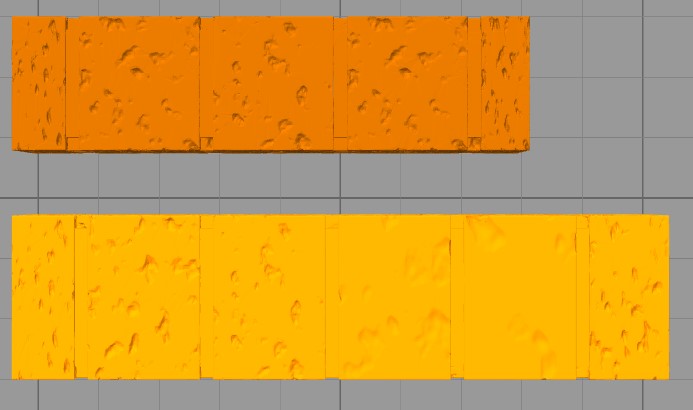
The top-most asset is a corner wall of the “rcorner” designation, which I assume means that it’s used to create a right corner. The lower asset is an “A” wall. As you can see they are quite different, but they are the same height though. None the less, I’m not really sure when or how to use them as I need a wall that spans 3 inches.
Going back in time
The yet to be discovered unknown wall piece depicted above would allow me to build a dead end, something that might be less than useful but you never know when you’ll need it.
Referring back to the size table in my first post on the topic you’ll see that there is no base or other asset that is 0.5 x 3 inches. Or at least not in the current files.
By going back to the deprecated release of the cut-stone walls I was able to find a “D” size wall that seems to do the trick though. I’ll get my Wanhao to print it right away and we’ll see. The wall has a “built-in” base but the Openlock openings seems to line up as needed so fingers crossed.
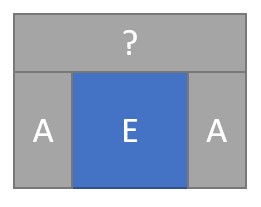
The post linked to above also has a semi-useful graphic indicating the relationship between the different tiles. I write semi-useful as it’s deprecated and therefore incorrect, at least in relation to the current version of the assets.
This graphic does indicate that a “C” wall and it’s mirrored brother could be what I need to be able to build internal corners but it’ll take roughly two hours to print the “D” wall as fast as my printer can manage so I’ll wait with the “C” walls until tomorrow.
That’s it for the moment
I’m not really sure what I’ve actually learned today, except that corners doesn’t seem to be up to date? Either that or I’m not just clever enough to understand them, which absolutely is a possibility.
I have a couple of ideas on how to “remix” some of the assets to hopefully simplify the creation of scenery but so far my tests haven’t been fruitful so I’ll hold off on posting any results for a while.
Thanks for reading!

One thought on “Getting to grips with OpenForge – part 2”