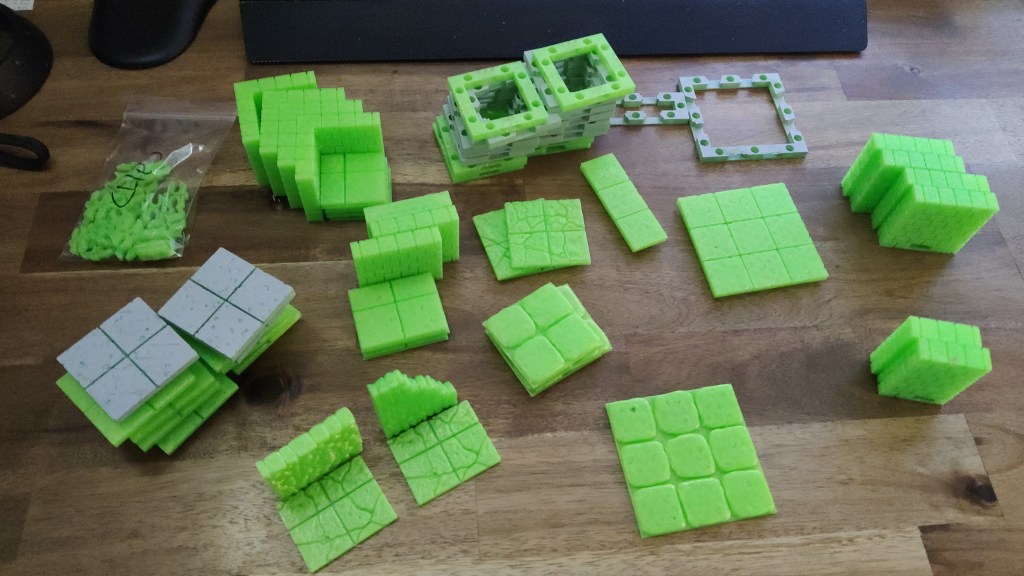
I’ve been printing a fair amount of assets, mostly floors, and I still need to glue a lot of them and paint even more so for now I’m going to pause the printing.
Mostly Cut-stone and mostly floors. To the right you can see the new “3.0” walls that I’m not sure how to use properly.
My use of “base pegs”
In the instructions for the floors (which I honestly can’t even find now) Devon writes that you print the base of choice, install the magnets in the base if you go that route, and then glue the floor to the base.
This means that I need eight magnets – and in my case they cost roughly 43 US cents (or roughly 39 EU cents) a piece – and also as a base for every floor, wall, door, window and so on. For the basic set Devon mentions that you need 376 magnets, totaling roughly 160 USD / 145 EUR for a complete set in magnets alone.
As I mentioned in one of my earlier posts, I couldn’t get my magnets to work properly so I’m actually skipping them even though they absolutely would be the best option if I could get them to work. None the less, I’d prefer to not have to print and paint more bases than necessary.
So, in an attempt to minimize the number of assets I need to print and paint I’ve devised a different way of gluing things together by using “base pegs” (to differentiate them from the “wall pegs” that are used on some walls).
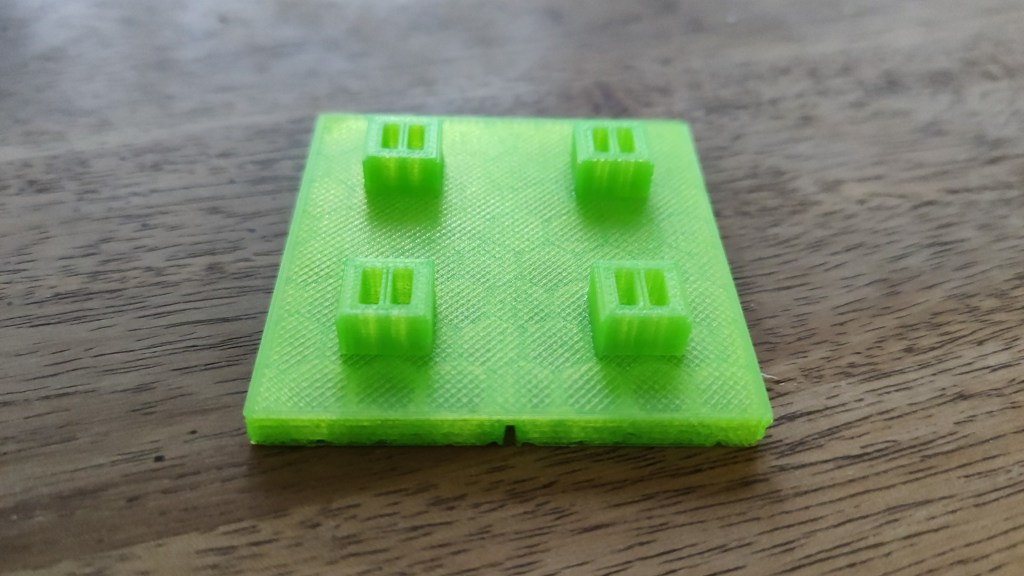
9 x 9 mm base pegs attached to a floor tile.
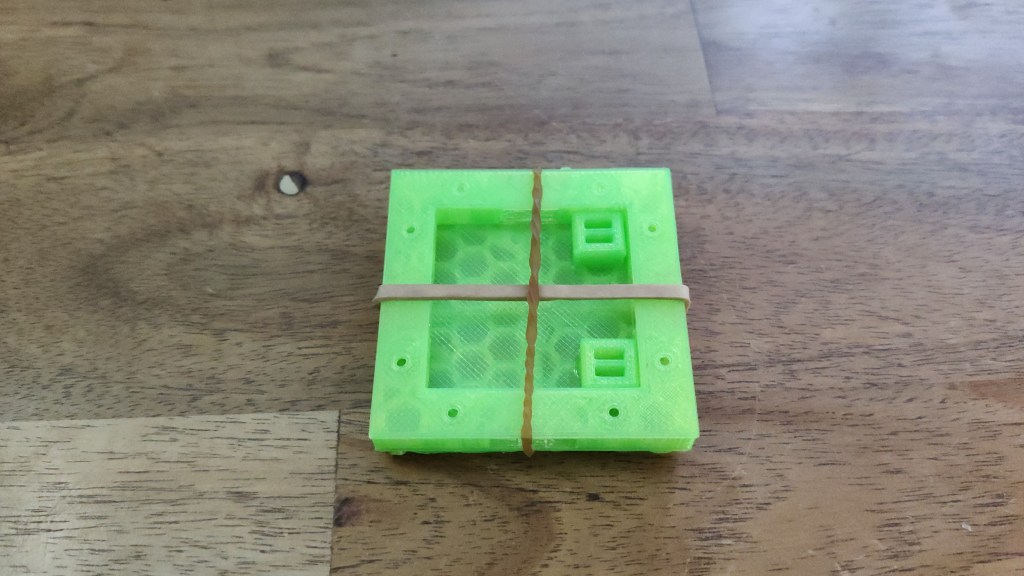
I use rubber bands to hold the base and the floor tile together and then glue a peg in each of the four corners of the floor tile using superglue, being careful to use as little glue as possible to minimize the risk of inadvertently gluing the floor to the base.
Gluing the base pegs to the floor tile.
This allows me to use a single set of bases for all of my floors, walls, doors, etc. This is the reason I’m only printing Plain bases as they can be used for all sets without looking out of place.
Broken floors
With a number of Cut-stone assets printed, as well as a few Dungeon stone, I wanted to diversify my set by printing some Rough stone and Ruined stone assets. Unfortunately, this was just as confusing as before.
In the set guide for Rough and Ruined stone the links to the floors on Thingiverse both point to the same collection. This collection contains two sets of floors, broken and ruined.
I’m guessing that broken is the same as Rough since I can’t find any mention of “rough” in the collection.
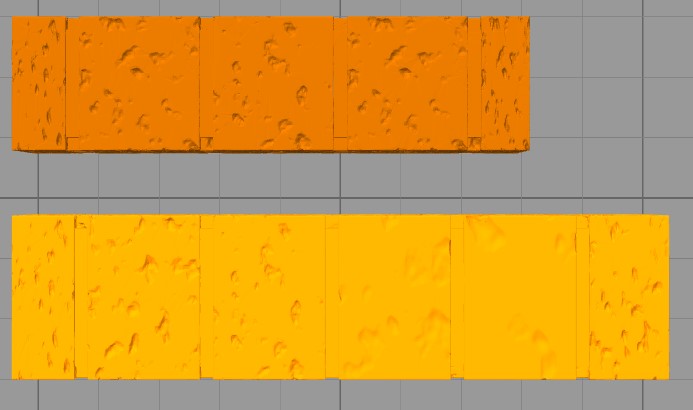
For these sets Devon put in some extra effort to make the floors look much more organic.
The floor tiles in this set have a first – there is a pattern they all fit into, or you can jumble them. When I do the textures for the huge 6×6 floors, I’ll make the pattern be infinite repeating. This release contains 9 2×2 floors, which cover all the possible positions 2×2 can be in this pattern. I personally recommend printing all of them to give a widely varying floor.
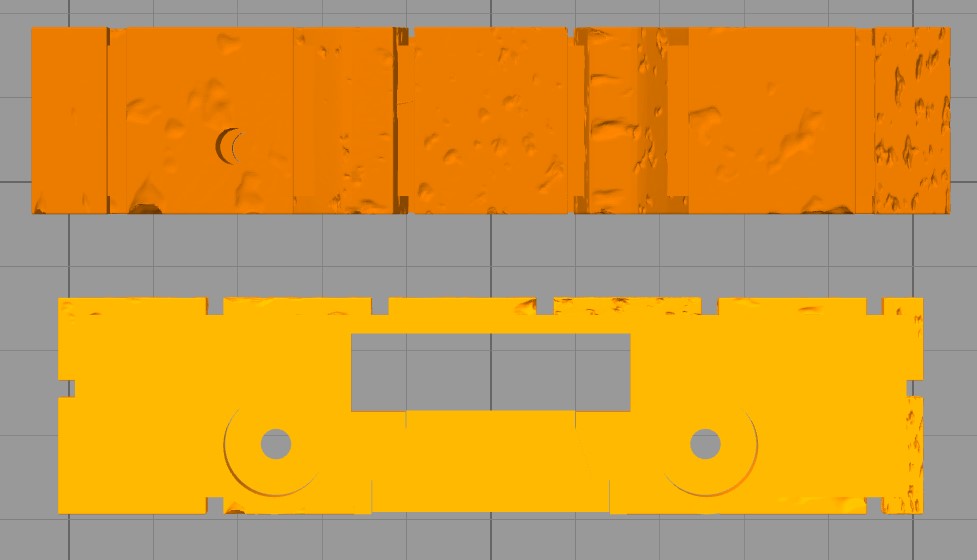
This is a great touch. The problem is that in this collection I can only find two assets of the “E” (2 x 2 inches) size of the Rough (broken) stone floor; broken_stone_floor.floor.inch.2×2.h,stl and broken_stone_floor.floor.inch.2×2.i.stl. As for the Ruined stone floor, there are four variations; a, d, e and f.
Never mind! When doing a bit more sleuthing to try and get to the bottom of this it turns out that Thingiverse isn’t including all of the files in their “one-click download” functionality. Downloading the individual files works as intended though.
What about walls?
For the walls, we also have one collection with Rough (broken) and Ruined in it, although with a different take on things. There are only Rough floors and no Rough walls, only Ruined walls (as well as Ruined floors).
In this case Devon pulled out all the stops though and the variety is truly impressive. We have twenty-four different floor tiles – including the nine variations of the “E” size floor – for both Rough and Ruined. These range from 1 x 1 to 4 x 4 in a number of different combinations.
On top of this he’s produced eighteen walls that not only differ in size but also height. For the 1 x, 3 x and 4 x walls there is one asset for low height, one for minimal height and one for full height.
For the 2 x walls there are the same three assets as for the other size of walls but also transitions from full to low, full to minimal, minimal to full, minimal to low, low to full and low to minimal.
This makes it a whole lot easier to build the scenario you want and adds a very organic look to the walls. I’ve only printed a few of these but I can absolutely see the potential.
That’s it for the moment
I’ve run out of time and superglue so I’ll stop here. Hopefully this is of use to some of you that wants to get started with OpenForge, which I absolutely think you should.
Sorry for the delay of the next part, I just got my printer working again after a couple of mishaps. On top of this I have a project that I need to finish today – a welding table – so even though my printer is printing more assets right now (a ruined “E” stone floor to be precise) I might not be able to get another post up until next week.
Let’s quickly address my idea about using a wall base to put a door frame on. It seems to work, but I printed both the door frame and the door with support – thinking that it was required – and the end result was really rough.
I’ll try and print them without support later to give it a proper try.
I might be too cutting edge
Seeing that I’m making very little progress on the cut-stone set I decided to take a look at the other sets, more precisely dungeon stone and rough stone. They both have the same incompatible types of assets as the cut-stone set, with one major difference – they don’t seem to have any sort of “separate wall” update.
This makes me think that the reason I’m having such a horrible time figuring out OpenForge is because the “separate wall” update of cut-stone, the one I’m using as a reference, is actually the odd one out. None of the other sets seem to have this specific collection of assets.
If I’d have to wager a guess, I’d say that the “separate wall” update to cut-stone is OpenForge 3.0. All the other assets are actual 2.0, meaning that in order to move forward with my cut-stone set I’m going to have to print the “incompatible” combined wall and floor tiles.
This theory is confirmed by looking at some of the latest assets from Devon for the cut-stone set. This set of archways was released late June 2019 and they are constructed the same way as the (formerly) odd walls, windows and doors for this set.
I can still use all my floors, which is good because I’m printing four more “E” size as I type this, but I’m pretty sure I’ll have to scrap my walls. I’ve been doing some tinkering with how to attach floors to bases but I think I can make this work for a floor + wall combination.
OpenForge and OpenLock are not the same
For some of you this is obvious but I just found out, as it often seems to be, from information contained within a collection on Thingiverse.
I’m going to be working on this set doing releases for OpenForge 2.0 and OpenLOCK concurrently. OpenLOCK requires a lot of extra work, so likely the classic OpenForge 2.0 set will make it out first, defining the shapes, and then the equivelent OpenLOCK set will come out right after.
I understand that OpenForge is the name of the project Devon started and that OpenLock is a non-proprietary connection method, the thing that doesn’t make sense is that there are two different versions of an asset for OpenForge and OpenLock.
I can’t really figure out why, either. There are eight connection options listed in the instructions for sets and OpenForge isn’t among them:
magnetic – has holes for 5mm magnets on edges
openlock – has openlock clip holes at vertices
magnetic.openlock – has openlock clip holes at vertices and holes for 5mm magnets on edges
triplex – has openlock clip holes at edges and vertices
infinitylock – has infinitylock clip holes at edges and vertices
magnetic.infinitylock – has infinitylock clip holes at vertices and holes for 5mm magnets at edges
dragonlock – has dragonbite clip holes at vertices
magnetic.dragonlock – has dragonbite clip holes at vertices and holes for 5mm magnets at edges
The set instructions was updated the 19th of August 2019 and the rough stone collection the 16th of May 2018 so my best guess is that there at some point was a difference between OpenForge and OpenLock. Maybe?
In parallel with this I’ll start painting the assets as lime neon green is not a very immersive choice of color for a DnD session. I’ve already painted some floors with primer to see what print quality I need to go with in order to have enough detail without requiring 12 hour prints for the most basic of assets.
This update is a lot shorter than I had intended but that’s the nature of these “exploratory” posts, you never now what you’ll find when you start writing and researching.
My next post will be up on Monday at the earliest as I need some time to print the walls, windows and doors. That post will most likely be the last in this series as I feel I’ve reached some sort of conclusion. Maybe I’ll write a stand-alone post with my findings as well as an analysis of why this is a lot harder than it needs to be.
When we left off I wasn’t sure about corners – and I’m still not – but I’ve realized that I can’t rely on the old, deprecated walls to solve my problems. The “D” size wall that I printed only almost worked as it’s a couple of millimeters to narrow to line up with the other, up to date, walls.
Also, the “C” size wall I mentioned is replaced by an updated version, the “IA” wall with the corresponding base which I’ve printed over the weekend. It’s working as intended and aligns up perfectly with the other walls.
For now, I’m going to take the easy way out and not worry about “dead ends” and only build internal corners. In order to start or end a corridor it’ll either just be open, or have a door.
Maybe doors will be easier to understand?
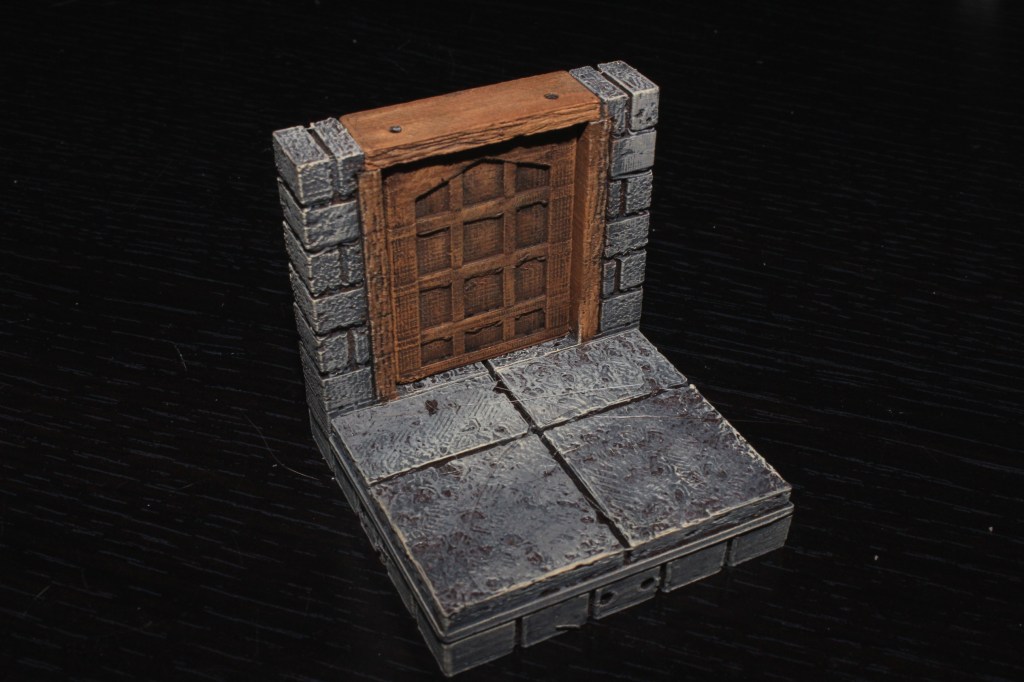
For my purpose, to end a corridor or hallway, the doors I can find will work.
An assembled and painted cut-stone square 2 x 2 door
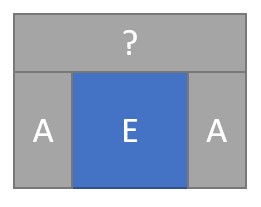
As you can see, the total size of the tile is the same as an “E” floor and the length of an “A” wall. But as soon as I want to integrate these into an existing wall, I run into the same problem as with corners – the doorway and the accompanying wall sits “inside” the floor. When printing separate floors and walls, the walls sit “outside” the floors.
At this point I should of course ask for help on reddit, facebook or on Thingiverse but I want to chronicle (pleased read that word in a rather pretentious voice) how easy or hard it is to get started with OpenForge based on the information at hand in the official tutorials.
The “frankendoor”
My plan was to use an “A” wall base for the door frame in order to be able to place it “outside” of the floor and in line with the rest of the walls, but of course it’s more shallow compared to an ordinary wall.
The door frame (top) compared to an “A” wall base (below)
These are the same width, the difference stem from how Simplify3D displays the models.
I’m still going ahead with this idea, I don’t really care how well the door frame aligns with the base, it’s a small enough error that I can live with it. What bothers me though is that I seemingly have to hack together my own solution to what shouldn’t be a problem to begin with.
Right now my printer is busy for another couple of hours but I’ll try and get this tested tomorrow or overmorrow at the latest.
How about windows?
The same deal as with doors.
Down the rabbit hole
Right now I’m not even trying to follow any path in my writing, I’m just going wherever my “investigation” is taking me.
All the “unusable” assets like doors, windows and corners was quite old, from 2016 so I figured that they simply weren’t compatible with the floors due to being old but the floors are also updated in 2016.
Earlier in my journey I somehow stumbled upon a specific set of links, clicked on in a very precise order, that lead me to a recent set of assets – the so called “OpenForge 2.0 Cut Stone Separate Wall Primary Walls.”
I’ve spent the past 5 minutes trying to find any way to go from the tutorials to these assets but to no avail. Only by manually going through Devon’s latest work on Thingiverse was I able to find them again.
These assets are from Jun 24, 2019 and are described as “… a huge update of cut stone separate walls.” Despite this, the original “OpenForge 2.0 Cut Stone Wall” collection is the one linked to from the tutorial.
Is there perhaps an update coming to the corners, doors, windows and other assets? It doesn’t seem like it as the latest creations from Devon are assets unrelated to this set, although still very much for OpenForge.
Also, while browsing through the multitude of pages, collections and instructions I noticed one important(?) thing about the scaling of the assets.
Initially all OpenForge tiles was based off of 25 mm squares but has since been updated to 1 inch (~2.54 mm) squares. There is confusing (and perhaps even conflicting?) information about this though.
On a number of Thingiverse collections the following instructions are attached: “The tiles are in inch square basis (which matches most commercial printed tiles). If you want that size, print without changes, and print one of the inch bases. If you instead want 25mm squares (The historical scale of OpenForge), scale the floors on X and Y or walls on X, Y and Z by 98.4% and print one of the 25mm bases. “
In the introduction to the OpenForge sets, on GitHub, linked to from the main tutorial, we read this: “OpenForge internal tiles and dwarven forge are based on 25mm squares. Printable Scenery, Dragonlock and Hirstarts are based on 1″ squares. To make the 25mm tiles the 1″ scale, scale them up to 101.6%. To do the reverse, scale 1″ tiles down to 98.4%. however, the OpenForge bases are already the right size. DO NOT SCALE THEM, as it will break the openlock connectors.“
Which is it? I’m simply printing them as-is and they come out as multiples of inches so at least the assets I’ve printed so far are correct but the text doesn’t make this obvious.
That’s it for the moment
I will keep printing and (soon enough) painting as many OpenForge assets as I can and need. The system has – as I’ve mentioned before – huge potential and there are many, many assets that absolutely will enhance a gaming session.
There is however clearly much work needed when it comes to managing the actual project, especially in regards to information and asset management. Right now it’s, as I’ve tried to illustrate, extremely confusing to figure out what to print and how if you just want a basic starter set.
I’m almost done with my first iteration of the wall and floor size guide but I just want to make sure that I’m not missing anything obvious before releasing it.
The more I think I know, the less I actually understand.
I’ve spent parts of the day assembling the parts I’ve already printed and it was quite enlightening. The reason I go with Magnetic+Openlock is because that’s what Devon recommends in the tutorial.
I love doing openlock + magnetic. Magnets make life way easier when you are quickly building a map at the table. Openlock makes it much easier to build rooms ahead of time that you don’t have to worry about getting knocked apart. The combination is great.
I was really excited to try this out as I could see the potential in this setup, but when I tested this earlier today it turns out that magnets aren’t that great, much to my dismay.
It could very well be that I bought the wrong sort of magnets, I had to order mine from a source in Europe, but the tiles didn’t attach well at all and as spherical magnets do have polarity I even ended up with tiles repelling each other. [Edit: It turns out that you're meant to use neodymium magnets, but I unfortunately only found this information in the instructions for this Thingiverse collection, after I bought the cheaper ferrite magnets.]
In the end I was able to remove all magnets from the bases without ruining neither the magnets nor the bases so no real harm done. It’d been neat to get this to work but it’s not a big deal.
The OpenLock system works like a charm on the other hand. It snaps together with a satisfactory click and stays together. Yes, it’s a bit more time consuming to build compared to magnets but we’re talking minutes so again, not a big deal.
Let’s keep building
I ended the previous part with a wall and it’s base being printed, and as I write this there is another three walls and bases, as well as three more cut-stone floor tiles on the way.
With these printed I need to tackle the so far most confusing asset, the corner, in order to be able to build something useful. This is a prime example of where the disjointed nature of OpenForge comes to light.
I’ve been ignoring the very obvious elephant in the room, namely where you can find all of the assets I talk about without having to trawl through GitHub and Thingiverse, on purpose. The reason for that is because I don’t really know where to get the correct version.
Some pages are linked to from the official tutorial only to be labeled as deprecated and in turn pointing to a new page that contains almost the same information and/or files. I’m hoping to be able to post some sort of guide when I’ve figured out what’s what.
There are three links to cut-stone corners in the set description at GitHub, with two of them being deprecated and redirecting to the first so I guess this is the official one to use. The image below shows one of the corners in this collection.
A 2 x 2 cut-stone corner
Notice anything “odd” about this one? Yeah, there’s only 1.5 inches of floor with the rest of the 2 x 2 tile being used by the wall. For reference, here’s what an “E” floor looks like.
An “E” floor tile from the cut-stone set
If I attach this floor tile to that corner tile it’s not going to work, or at least it’s going to look really dumb.
Ok, after roughly 20 minutes of poking around the various files I’ve downloaded I just found out that there are specific corner walls that are different from stand-alone walls.
A comparison between a corner wall (top) and a stand-alone “A” wall
The top-most asset is a corner wall of the “rcorner” designation, which I assume means that it’s used to create a right corner. The lower asset is an “A” wall. As you can see they are quite different, but they are the same height though. None the less, I’m not really sure when or how to use them as I need a wall that spans 3 inches.
Going back in time
The ever elusive 3 inch wall piece
The yet to be discovered unknown wall piece depicted above would allow me to build a dead end, something that might be less than useful but you never know when you’ll need it.
Referring back to the size table in my first post on the topic you’ll see that there is no base or other asset that is 0.5 x 3 inches. Or at least not in the current files.
By going back to the deprecated release of the cut-stone walls I was able to find a “D” size wall that seems to do the trick though. I’ll get my Wanhao to print it right away and we’ll see. The wall has a “built-in” base but the Openlock openings seems to line up as needed so fingers crossed.
The post linked to above also has a semi-useful graphic indicating the relationship between the different tiles. I write semi-useful as it’s deprecated and therefore incorrect, at least in relation to the current version of the assets.
This graphic does indicate that a “C” wall and it’s mirrored brother could be what I need to be able to build internal corners but it’ll take roughly two hours to print the “D” wall as fast as my printer can manage so I’ll wait with the “C” walls until tomorrow.
That’s it for the moment
I’m not really sure what I’ve actually learned today, except that corners doesn’t seem to be up to date? Either that or I’m not just clever enough to understand them, which absolutely is a possibility.
I have a couple of ideas on how to “remix” some of the assets to hopefully simplify the creation of scenery but so far my tests haven’t been fruitful so I’ll hold off on posting any results for a while.
I honestly can’t remember how I found OpenForge. It might’ve been through Twitter or one of the 3D-printing related YouTube channels I watch but none the less, I really like the idea behind the project.
OpenForge is at it’s core a set of “open source” – if you’ll allow me the use of the phrase – walls, floors, bases, doors, windows and many more assets that can be used to create locations and scenarios for your role-playing sessions.
In theory it’s as simple as pie; you download the asset you want and then print it on your 3D-printer. In reality it’s a lot more complex than that, hence this series of posts.
It’s not a given that I’ll ever completely figure out how to get to grips with OpenForge but I will be writing about it so if you feel like tagging along you’re more than welcome.
Options, as far as the eye can see
Devon Jones, the creator of OpenForge, is quite creative and productive. This manifests itself in five different types of sets; cut-stone (full and half height), dungeon stone, rough stone, ruined stone, and Tudor.
Each set contains assets of different shapes and sizes. I have yet to figure out if they all contain the same exact assets or if some sets are more complete than others. All sets have a number of bases, floor tiles, walls, windows and doors – and in some cases more than this. There’s also a set of plain bases to be used with any other set if you feel like it.
Each base has a corresponding floor or wall. What you need depends on the layout, with inner corners requiring one combination of walls and outer corners another combination, just to mention one example. Also, some walls have pegs that allows you to stack them.
In an effort to make OpenForge as compatible as possible with existing standards the bases comes in six different flavors depending on how you want to interlock your tiles. These flavors are Dragonlock, Infinitylock, Magnetic+Openlock,Topless Magnetic+Openlock, Triplex, and Topless Triplex.
Finally, as OpenForge has evolved over the years not all assets have been updated to the latest OpenForge standards. This is mostly indicated when you locate the assets on Thingiverse but it adds yet another layer of complexity.
Combine all of these options and you realize that there is ample opportunity to get lost, and at times I felt like just throwing in the towel.
I realize that I might sound overly negative so I want to point out that I truly appreciate the enormous effort that Devon is putting into this project. The amount of assets created is quite amazing and the last thing I want is for anyone to think that I’m not grateful for this. It’s just a bit much to take in, is all.
Putting it all together
As I write this I’m slowly figuring out how this is all meant to work – which is one of the reasons I’m writing this post to begin with.
The process of collecting the assets you need aren’t helped by the fact that tutorials, documentation, files and other much needed information is scattered between GitHub and Thingiverse. Unfortunately some of the documentation seems to be outdated or incomplete as well.
There is a tutorial but I didn’t really find it very helpful in explaining how everything is meant to fit together so here is my personal take on how to build an OpenForge collection.
Also, do not go to Thingiverse and start browsing the different collections of OpenForge assets – it will confuse the crap out of you.
1. Pick the style of set you want
One piece of advice Devon gives in the tutorial is to have many tiles for one set to give you flexibility, and then create a smaller amount of tiles from other sets to spice things up. He also mentions that cut-stone is meant to be “boring” as in “easy to mix and match with other sets.”
So, I’m going to start with cut-stone.
2. Pick the connection method you want
The way you connect your tiles depends on one thing, if you’re starting from scratch or if you’re adding to an existing collection.
If it’s the latter, pick the connection method that works with your existing collection, if you’re starting from scratch go with Magnetic+Openlock or Topless Magnetic+Openlock.
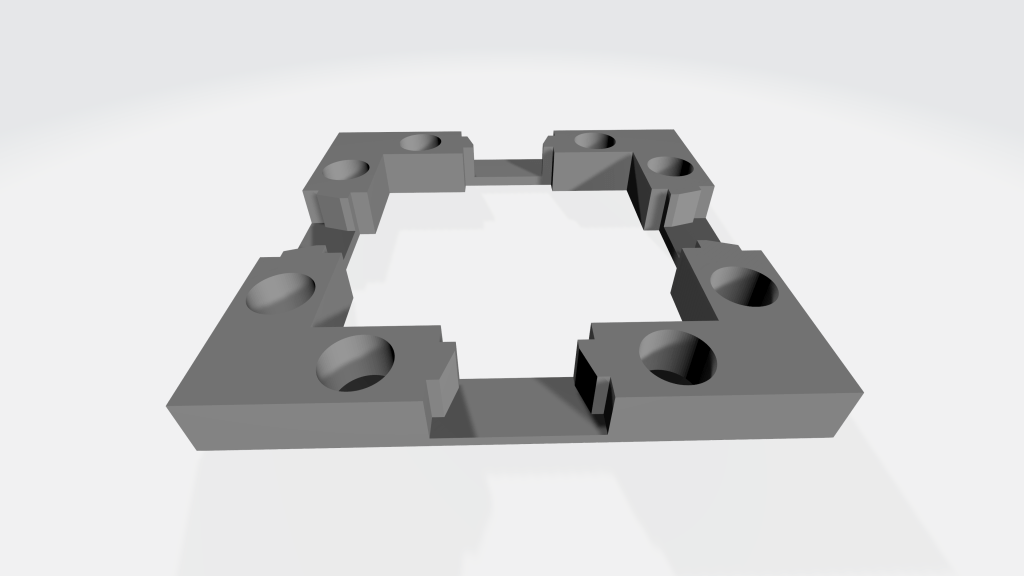
I’m going with Topless Magnetic+Openlock to make printing easier (see below for a render of this connection method).
3. Pick the base you need
Every set has their own bases in the specific style of that set. It’s up to you if you want to use the specific bases from that set or print the plain ones. I’ll be using the plain bases as I don’t care much about matching them with the style of the cut-stone set.
A render of the Topless Magnetic+Openlock “E” Plain base
The render above is of the “E” base, which indicates the size of the base. There are multiple letters used to designate what size the base is, and also different letters for floor bases and wall bases. [2019-10-10: I've updated the table below to indicate that walls are only 0.5 inches wide, and to include the "EA" floor size.]
Type of base
Tile size
Letter
Floor
1 x 2
S
Floor
1 x 3
SA
Floor
1 x 4
SB
Floor
2 x 2
E
Floor
2 x 2 curved corner
F
Floor
2 x 4
R
Floor
3 x 3
EA
Floor
4 x 4
U
Wall
0.5 x 1
IA
Wall
0.5 x 1.5
BA
Wall
0.5 x 2
A
Wall
0.5 x 2 x 2 curved corner
G
Wall
0.5 x 4
Q
The “BA” wall is used in conjunction with an “A” wall to create an inner corner, hence the odd size. The “BA” base also has a mirror version because of it’s odd size.
The sizes above are multiples of one inch. For example, the “E” base I’m printing is two inches wide on both sides of the base. The reason I’m going with the “E” size is to allow for multiple minis to occupy the same space and still be able to reuse the tiles for different layouts.
4A. Pick the floor you want
If you’re printing a floor, simply pick the same size floor as the base, in my case “E”.
4B. Pick the wall you want
This where I struggle the most because of the incomplete and/or outdated information, a “fragmented” collection of assets and odd naming conventions.
There is a deprecated post on what sizes of walls to use in what situations that does a decent job of illustrating the various combinations, but being deprecated means it’s outdated. The problem is that as far as I can tell there isn’t an updated version to replace it. I’ll start working on a replacement and as soon as I have something that I think is 95% accurate I’ll release it.
For now I’ll just print an “A” base and wall, but there is no option to print a plain base for walls as far as I can tell so I’ll use the bespoke cut-stone base.
That’s it for now
This is as far I’ve come so far. The wall and it’s base are printing as I type this and will be done later tonight.
Hopefully this is of some use to some of you. There’s still quite a bit to go through, like corners (do I even need them?), windows, doors and other more unusual assets so I’m certain I’ll be revisiting this topic soon.
Feel free to post a comment below with corrections, questions, or just general feedback.